Running scripts to start and stop services has been a task long associated with Exchange. For those who pre-date Exchange 2000, do you remember the fun issues with the increased WaitToKillServiceTimeout value? By default in ye olde days HKEY_LOCAL_MACHINESYSTEMCurrentControlSetControlWaitToKillServiceTimeout was 20,000 ms (20 secs). Installing Exchange increased that to 600,000 ms (10 minutes). To quickly shutdown an Exchange 5 or 5.5 system, it was always quicker to manually stop the Exchange services before restarting the OS. Most Exchange servers back then had a batch file on the desktop to automate that process.
While I have not had to do that since the 1990s, some of my under-provisioned lab systems need some help spinning services back up.
There are several ways we can go about automating the process to start up services which are set to automatic, but are not currently running. This can be done using standard PowerShell and also using Exchange cmdlets, but with some tweaking. Because of the extra work required, the standard PowerShell commands are shown first, and the work required to make the Exchange cmdlets to do the same is included at the bottom for reference/comparison. You can chose which one you want to use.
The below are a collection of the various fudges tips used in my multiple labs to save some time. If you are wanting to use a script in the start-up folder, then look at Example 1 or 2. If you want to run a script on one Exchange server, to start services on others, then look at example 3. Example 4 uses Test-ServiceHealth, and has some super nerdy fun working around some issues.
The below examples are to be executed with a elevated PowerShell instance.
Standard Windows PowerShell – Example 1
Exchange aside, other servers may also experience the same symptom. There are multiple scripts out there on ze interwebs to allow you to filter services and determine which ones to start. Note that most of the Internet samples look something like this:
Get-WmiObject Win32_Service -Filter "StartMode='Auto' AND State='Stopped'"
Get-WmiObject Win32_Service -Filter "StartMode='Auto' AND State='Stopped'" | Start-Service
In case you are wondering why Get-WMIObject is used in these examples, that is because it is more powerful than the standard Get-Service cmdlet.
Standard Windows PowerShell – Example 2
Another example is featured by our friends over at the Scripting Guy! blog, and there are some additions that were made in a comment, where additional logic was added to ignore certain services. While the above example #1 is good, it will try and start all services set to automatic that are not running. This may not always be what we want, as there may be services that we want to ignore, and should not attempt to start; take the .NET Runtime CLR optimization service. That is just one example, there are others. The sample command from the aforementioned blog was used. Yay – job done!! Well not so much – one swift copy and paste later we get this lovely error:
Get-WmiObject -Class Win32_Service –Filter “startmode=’auto’ and state=’stopped’ and (name > ‘clra’ or name < ‘clr’)”
Get-WmiObject : Invalid query
At line:1 char:14
+ Get-WmiObject <<<< -Class Win32_Service –Filter “startmode=’auto’ and state=’stopped’ and (name > ‘clra’ or name < ‘clr’)”
+ CategoryInfo : InvalidOperation: (:) [Get-WmiObject], ManagementException
+ FullyQualifiedErrorId : GetWMIManagementException,Microsoft.PowerShell.Commands.GetWmiObjectCommand
What happened? Its a classic issue when copying code from a formatted blog. In the examples below, the top line is what was entered above, and the bottom line will work. What is the difference?
The use of smart quotes is what went wrong. Replacing them with standard quotes (both single and double) allowed this to work.
Update 30-3-2017 - It appears that when blogs were migrated from the old platform to the new, that it changed to use smart quotes on all posts. Previously, smart quotes were not present when the post was on the original platform.
Update 6-1-2022 - Now that Internet Explorer is on the way out, and Microsoft Edge is replacing it, the same error occurs with the "Microsoft Edge Update Service" - EdgeUpdate. Added that into the command below. Left the .NET CLR optomisation in thought it is not present on Exchange 2019 it may be useful for older versions.
Modifying the quotes, we can use something like the below which allows us to start services with logic to ignore particular ones:
Get-WmiObject -Class Win32_Service –Filter "startmode='auto' and state='stopped' and (name > 'clra' or name < 'clr') AND (not Name like 'edgeupdate')" | Start-Service
Exchange Management Shell – Example 3
In Exchange we can use the Get-ExchangeServer cmdlet to return a list of all Exchange servers. This list can be filtered to return only servers in a given AD site, particular server roles or specific versions of Exchange. For details and examples of filtering, please see this post.
As a result we can get the best of both worlds, where we get a list of Exchange servers and then loop through them starting services as required.
Get-ExchangeServer | FOREACH {Get-WmiObject –Class Win32_Service -ComputerName $_.Name –Filter "StartMode='auto' AND State='stopped' AND (name > 'clra' or name < 'clr') AND (not Name like 'sppsvc') AND (not Name like 'edgeupdate') " | Start-Service }
Is this good? On the local server, yes! On remote servers it is not.
If we want to start the service on a remote machine Start-Service is not what we need to use. There is no –ComputerName parameter with Start-Service. However, Set-Service has a –ComputerName parameter. Since we need to pass Set-Service the right computer name, lets save that to a variable $SRV, which can then be used in the last cmdlet in our command. The modified command to display services not running is shown first:
Get-ExchangeServer | FOREACH {$Srv =$_.Name; Write-Host $Srv -ForegroundColor Magenta; (Get-WmiObject –Class Win32_Service -ComputerName $_.Name –Filter "StartMode='auto' AND State='stopped' AND (name > 'clra' or name < 'clr') AND (not Name like 'sppsvc') AND (not Name like 'edgeupdate')" | Set-Service -ComputerName $Srv -Status Running)}
In the above example the Software Protection service (sppsvc) was also filtered out.
Test-ServiceHealth In Exchange Management Shell – Example 4
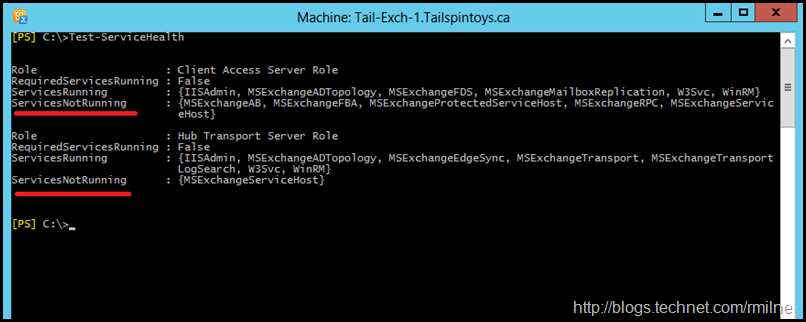
Exchange has the Test-ServiceHealth cmdlet to report on which services are running and not running for each role on a server. The below is an example from Exchange 2010. Note that the ServicesNotRunning line is what we should pay attention to, but it is not highlighted in anyway whatsoever. It is very easy to gloss over the fact that services are not running.
ServicesNotRunning is a NoteProperty. We need to expand out the NoteProperty so that we can start each required service. The below command is an example:
Test-ServiceHealth | Select-Object ServicesNotRunning –Expand ServicesNotrunning | Start-Service
Note that the screenshots below were taken from Exchange 2016. If you try the code on Exchange 2010 you will most likely run into the PowerShell remoting issue described in this post.
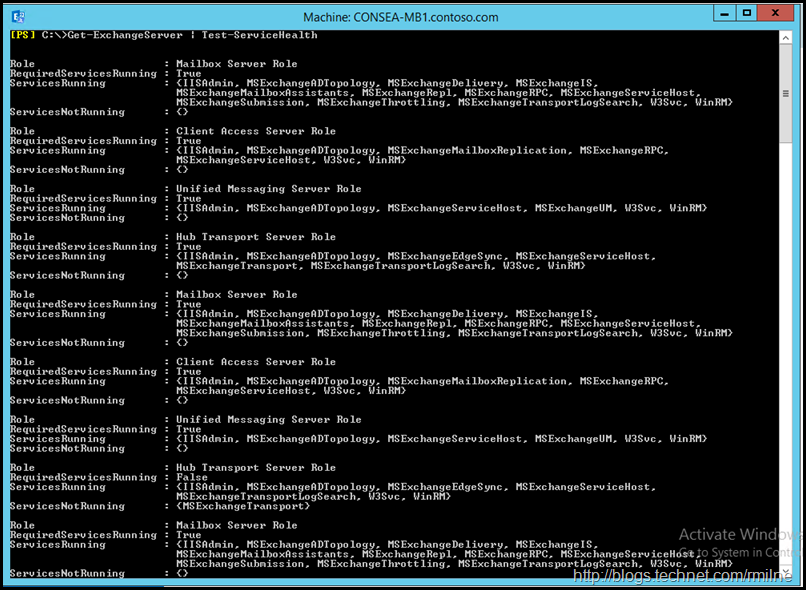
The Test-ServiceHealth cmdlet only looks at one server, but don’t get sad mad – we can pipe a list of Exchange server objects to it, and evaluate each using Test-ServiceHealth. Life is then all good? Well not quite. Lets look at the output:
Get-ExchangeServer | Test-ServiceHealth
That formatting is a little lame as we don’t know which server is which. We can echo the server name and select only the ServicesNotRunning NoteProperty.
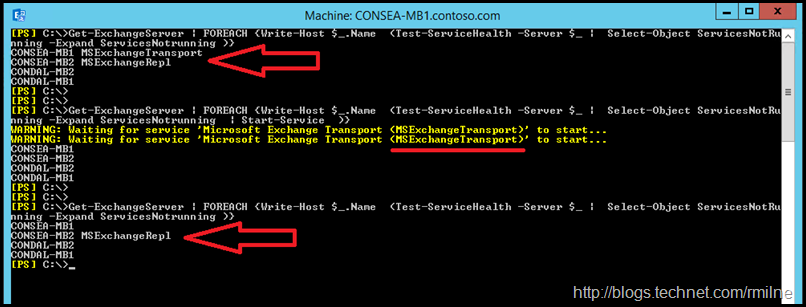
Get-ExchangeServer | FOREACH {Write-Host $_.Name; (Test-ServiceHealth -Server $_ | Select-Object ServicesNotRunning -Expand ServicesNotRunning )}
Better. Not Great though.
Piping that to Select-Object ServicesNotRunning –Expand ServicesNotrunning | Start-Service does not start the services that need to be started. We can see this below. Note that we are running the command on server MB1. A service is not running on MB1 and also MB2. This is detected, and simply piping to Start-Service only starts local services. The service on the remote machine is left in a stopped state.
If we want to start the service on a remote machine Start-Service is not what we need to use. There is no –ComputerName parameter with Start-Service.
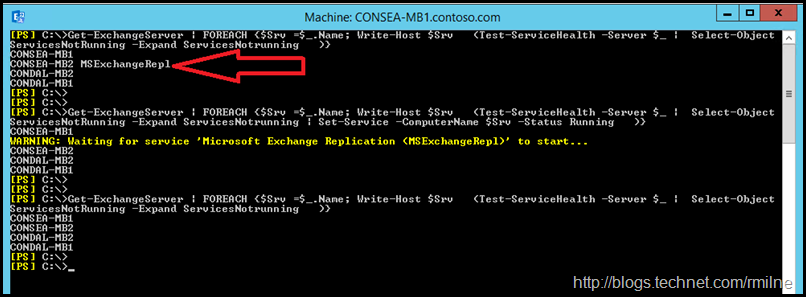
However, Set-Service has a –ComputerName parameter. Since we need to pass Set-Service the right computer name, lets save that to a variable $SRV, which can then be used in the last cmdlet in our command. The modified command to display services not running is shown first:
Get-ExchangeServer | FOREACH {$Srv =$_.Name; Write-Host $Srv (Test-ServiceHealth -Server $_ | Select-Object
ServicesNotRunning -Expand ServicesNotrunning)}
Then we add in the Set-Service cmdlet to start the remote service. The name of the service is passed down via the pipeline, and the other required parameters are specified.
Get-ExchangeServer | FOREACH {$Srv =$_.Name; Write-Host $Srv -ForegroundColor Magenta; (Test-ServiceHealth -Server $_ | Select-Object ServicesNotRunning -Expand ServicesNotrunning | Set-Service -ComputerName $Srv -Status Running)}
At this point we are done? Well, it depends.
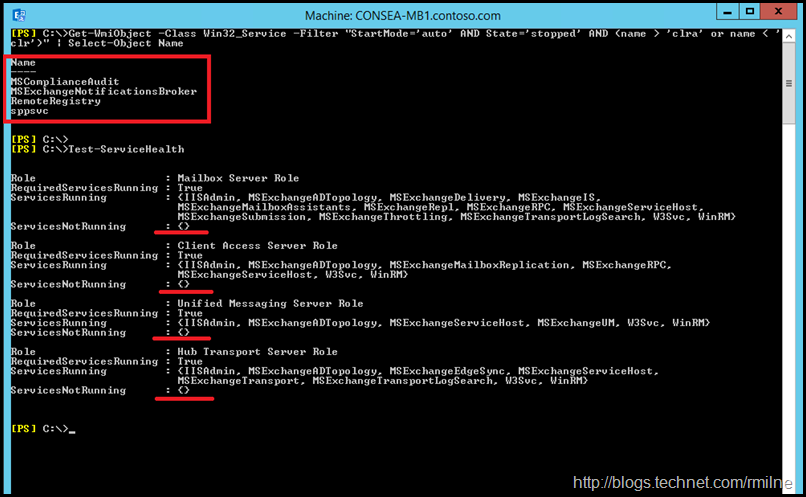
The below is taken from Exchange 2016 RTM. Note that there are multiple services not running. Test-ServiceHealth does not detect the fact that they are are not running. This is because Managed Availability will take over the responsibility of the legacy Test-* cmdlets.
Test-ServiceHealth should work as expected on Exchange 2007 and 2010. Exchange 2013 and onward feature Managed Availability.
Cheers,
Rhoderick


