Defining Azure governance so that your subscriptions, management groups is correctly built out and deployed is critical. Even with the best planning sometimes it is still necessary to move resources to a new subscription. While Learn documents how this can be done, it does not work for all scenarios.
Bullet point #5 illustrates an issue where subscriptions may belong to different tenants.
There are also steps that you can perform to transfer the billing ownership of to a different identity in another tenant.
Neither were a valid option for a recent issue. In this case the original Azure subscription was being retired which necessitated moving VMs to a new tenant. To further complicate matters, the new subscription was located in a tenant where the provided identity was only an external account. Additionally, certain options could not be completed due to the very strict Conditional Access policies deployed in that tenant. This meant that the regular discovery and assessment processes that had been previously used would not work as the assessment tool was blocked. We will have to do things manually.
In A Perfect World
Normally you would deploy the assessment framework which helps discover the environment. This can then be used to initiate the migration as the resources have been discovered and can be simply added to the migration project.
Below is a screenshot from the Assessment tools of the Azure portal. Normally you would click the Discover button then download and configure the appliance.
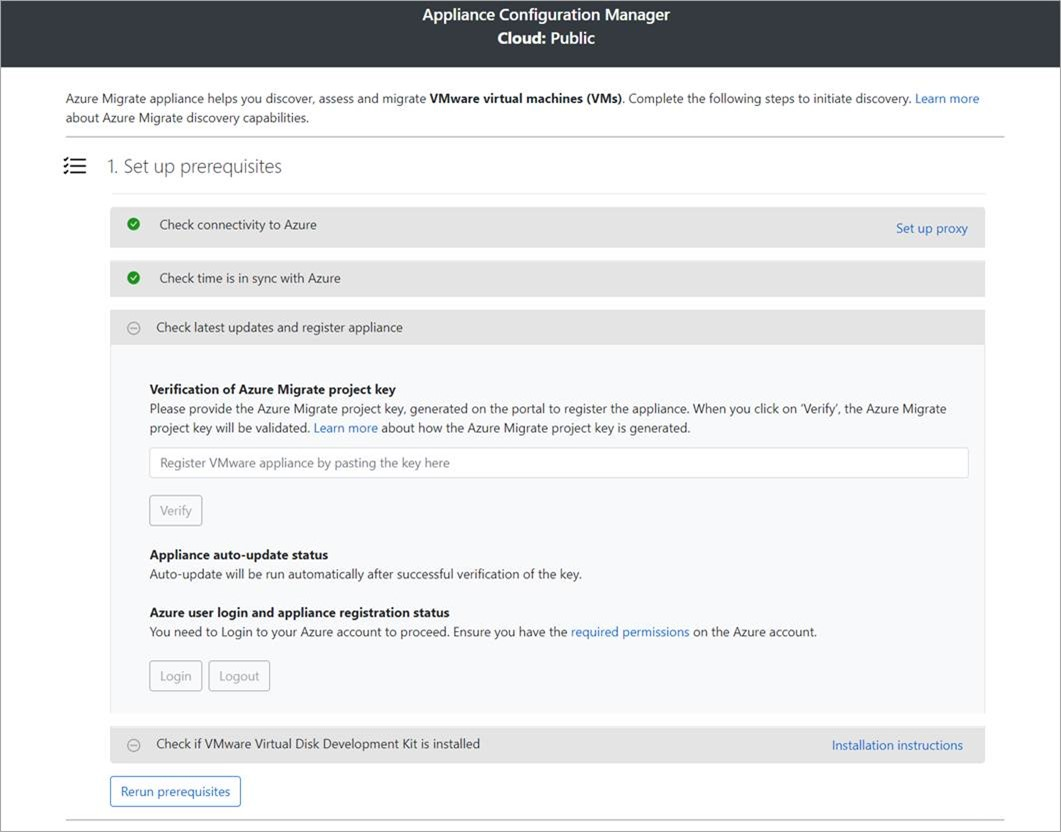
Following the Docs/Tutorial goes without issue until you try to actually configure the appliance. Once the appliance has been installed you then need to configure it. Part of this is authenticating to Azure.

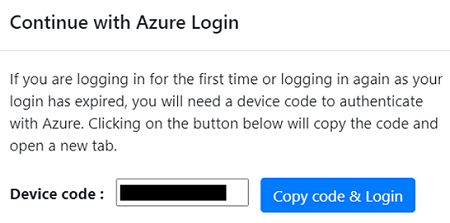
Specifically, the step experienced was where you need to authenticate using a device code flow. The relevant text from Lean and the UI prompt is included below for reference:
To register the appliance, you need to select Login. In Continue with Azure Login, select Copy code & Login to copy the device code (you must have a device code to authenticate with Azure) and open an Azure Login prompt in a new browser tab. Make sure you've disabled the pop-up blocker in the browser to see the prompt.

This was blocked by the Conditional Access Policy which required the device to be compliant and registered in the other tenant.
Fortunately, it was possible to skip the assessment phase and manually perform the migration. The steps used are outlined below in this Docs article:
Migrate Physical Servers to Azure
But since we are doing this manually, there is work to be done first...
Document Source Environment
Since we are not able to capture all of the information via an assessment, we will need to perform this ourselves. For VMs, take note of the configuration so that you have enough detail to recreate it. This will include details such as:
-
VM Size
-
Disk layout
-
Disk type (SSD/HDD)
-
Availability set
-
Assumed that we are not migrating the D:\ Temp drive as that is disposable
In addition to VMs, also review and document:
-
Load Balancers
-
Monitors
-
NAT rules
-
LB rules
-
-
Public IPs
-
Virtual Networks & Subnets
-
VM Boot type – secure boot to be disabled if V2, see troubleshooting section at end
Prepare Destination Environment
Pre-Create the various infrastructure underlying resources that you will need. For example:
-
Storage Account
-
Virtual Network
-
Subnets
-
Configure DNS servers on virtual network
-
Availability Set
-
Load Balancer
-
IP Resources
-
Bastion
-
VPN for Management
The VMs themselves are to be created via the migration process.
It is important to create the underlying resources first. If you have the underlying infrastructure requirements met, you can easily select them in the Replicate VM process as illustrated below. More on the actual replication later on, this is to illustrate why we want to do the prep first.
Install Replication Appliance
As noted above the steps to install the replication appliance are outlined below in this Docs article:
Migrate Physical Servers to Azure
The appliance will be installed on a current version of Windows server that has connectivity to the VMs we want to migrate. Follow the steps in the article to configure Azure Migrate and the replication appliance etc. Also ensure that you finalize the configuration after installing the appliance so that it has the necessary policies. The UI will prompt if this is not done.
Prepare Source Environment With Migration Tool
We need to install an agent on the VMs to migrate. The source files are available on the replication appliance. See this section for details.
They can be found in:
%ProgramData%\ASR\home\svsystems\pushinstallsvc\repository.
We will need to install the Azure Site Recovery (ASR) agent onto all the VMs we want to migrate. While these are VMs in Azure, they are to be treated as physical servers. This means that we will install the mobility agent that will replicate the contents of the disk. This will run inside the VM rather than on the underlying hypervisor.
The steps to perform this action is discussed here: install mobility agent. Note that the solution was updated to the new and "Modernized" version. That is the one that we should be using, and the source file name is different from the classic one which is shown below. The new name will be something like Microsoft-ASR_UA_9.61.0.0_Windows_GA_18Mar2024_Release.exe
An example of installing and configuring the SRA agent via the command line is shown.
Below is a sample batch file that can be used. You will need to change the paths etc. to suit your environment and also provide your configuration passphrase. The passphrase is contained in the Config-Passphrase.txt file. If you have lost or forgotten the passphrase, then review this article.
The syntax used in April 2024 is shown first, then the older for reference purposes.
You will copy the current installer file, extract it and then start the install using the UnifiedAgent.exe command as before, but the switches are now different.
Copy the above noted file to C:\Temp Microsoft-ASR_UA_9.61.0.0_Windows_GA_18Mar2024_Release.exe
Then we need to extract it.
Microsoft-ASR_UA_9.61.0.0_Windows_GA_18Mar2024_Release.exe /q /x:C:\Temp\Extracted
If you wish - place the PassPhrase file into the folder so you just have to copy the folder to the target machines. This makes it a nice convenient package to copy to each machine that is to be migrated.
On the machine you want to migrate run the below to install then configure the Mobility Service. Note -- This is NOT the replication appliance. it is the machine that we want to migrate.
Copy the Extracted folder and run the below in an elevated cmd prompt.
UnifiedAgent.exe /Role "MS" /InstallLocation "C:\Program Files (x86)\Microsoft Azure Site Recovery" /Platform "VmWare" /Silent /CSType CSLegacy
Once installed configure the Mobility Service:
”C:\Program Files (x86)\Microsoft Azure Site Recovery\agent\UnifiedAgentConfigurator.exe” /CSEndPoint <CSIP> /PassphraseFilePath <PassphraseFilePath>
An example batch file is shown below:

The pause command is used to hold the window open so I can read the details.
Old Mobility Service Syntax
With the move to classic / modernized the options have changed - below is the old install parameters from 2022.
C:\Temp\Extracted\UnifiedAgent.exe /Role "MS" /Platform "VMWare" /Silent
CD C:\Program Files (x86)\Microsoft Azure Site Recovery\agent
UnifiedAgentConfigurator.exe /CSEndPoint 172.16.0.6 /PassphraseFilePath C:\Temp\Extracted\Config-Passphrase.txt
Note that even though we are treating this as a physical VM migration, the option of VMware is required.
Migrate VMs To New Subscription
Once the agents have been installed, ignore the top half of the migration screen and jump down to the migration tools section as indicated by the dotted red arrow.
You may choose to disable particular services on the VMs to help with the migration. This was done for on a couple of servers in the environment particularly the Exchange servers. This was to minimise the Disk IO and help with application consistency. Exchange services were stopped and disabled.
Delete any unwanted temp or source files to minimise the amount of data copied.
Once the source machines have been prepared, the replication wizard is straightforward.
Select to migrate VMs to Azure.
Remember that the agent is installed onto each VM which means we will use the "Physical or other" category.
Select the replication appliance.
On the next screen we will need to specify the settings manually since we were unable to run an assessment.
Select the manchine(s) you want to replicate and complete the wizard.
Optionally you may unselect the Azure temporary disk and only migrate disks that contain data alongwith the OS disk.
Post Migration
Some post migration items will inevitably need to be addressed. They may include:
-
Ensure the source VMs have been powered off to prevent duplicate billing and prevent duplication of workflows
-
Update DNS records
-
Host file entries may need to be reviewed and updated
- Enable and start any disabled services
-
Internal DNS records may need to be reviewed if you changed the IP address space
-
Create NAT rules if required
-
Uninstall Mobility Service (SRA agent) if desired
-
Test and validate VM functionality
-
Resize VMs
- Set VM Boot Diagnostics to use managed storage account. May default to a custom storage account
-
Change disk type if initial selection was not correct
- Delete Aure Migrate resources
- Delete source VMs
Once functionality has been confirmed, delete the initial Azure VMs and associated resources.
Troubleshooting
In this post the intent was only to migrate the OS disk and data disks. Did not bother migrating the temp VM drive.
Secure Boot
Machines with Secure Boot will run into an issue installing the agent. See the example errors below.
For search engine benefit, the error message was.
"error_name": "ASRMobilityServiceBootUEFISecureBootNotSupported",
"error_params": {},
"default_message": "\n UEFI Secure boot is not supported"
}
To address this, disable secure boot and re-try the installation.
Credential Missing
There has to be some form of a credential specified on the replication appliance. It may actually be needed or just totally fake, but it does need to exist.
Wait for the newly setup Replication appliance to update, or manually refresh it.
Finalise Configuration
Ensure you finalize the configuration, this is the step number three. In the screenshot below, the process was completed hence we see the Registration Finalized. Ensure that you complete this step.
Availability Set Not Found
If you get the message of “no availability set within chosen resource group”, the migration tool may require you to convert the Availability Set to Managed.
Select an appropriate VM size corresponding to the Availability Set. If there are no VM sizes, you will need to get those VM sizes in the subscription in order to use Availability Set.
One or More Disks Specified - 90068
Chances are you just installed the Mobility Service. Restart the target computer.
Then refresh the replication appliance, and you can click onto the failed job and restart it. If that still fails, remove and re-add the protection for that VM.
Also make sure that you are NOT trying to synchronise one of the system managed temp disks.
Move Replication Appliance to Different Resource Group & Change IP
If you have multiple resource groups and/or VMs on isolated networks you may try to move the migration appliance VM to that new network. Life will be easier if you can maintain the same IP address on the replication appliance. It may be faster to add a new subnet to the virtual network that matches the original IP of the replication appliance VM and move all the VMs to the new subnet. VMs will stay on the same virtual network, but moved to the new subnet.
If that is really not possible, then it will be an uninstall/reinstall. The Replication Appliance IP should not be modified.
Cheers,
Rhoderick


