TailspinToys Canada have been busy upgrading their on-premises, Azure and Office 365 infrastructure. Previously Azure resources were moved from classic (Azure Service Manager) to the new Azure Resource Manager (Azure RM). The VMs, storage accounts and VHDs were migrated. One of the migration blockers was that multiple availability sets were previously present in one of the cloud services. This prevented the resource migration, and the additional availability sets had to be removed in the cloud service prior to migrating to Azure RM. This was all peachy until I wanted to moved some of the migrated VMs into a particular Availability Set in Azure RM for load balancing purposes. However the Azure RM portal does not let you change the VMs Availability Set on the fly. Currently Availability Sets are set at machine creation time. The only way to change the availability set is to delete and re-create the VM.
In this case I wanted to create a new Availability Set for the AD FS servers, so that they could be load balanced in Azure. However when they were migrated from classic Azure all the VMs were in the same availability set, else they could not be migrated. Hence the requirement to delete and re-create the VM using the existing VHD.
At this time (November 2016) there is no Azure portal option to do this. But we have PowerShell….
Overview
I wanted to show that this task is not as daunting as it may initially appear, and also provide a simple code sample. One of the key cmdlets that we are going to use is New-AzureRmVMConfig.
The New-AzureRmVMConfig cmdlet creates a configurable local virtual machine object for Azure. Other cmdlets can be used to configure a virtual machine object, such as Set-AzureRmVMOperatingSystem, Set-AzureRmVMSourceImage, Add-AzureRmVMNetworkInterface, and Set-AzureRmVMOSDisk.
This post/script assumes that you have the necessary Azure PowerShell bits installed, and that you have permissions to the resources. It also assumes that you are connected, typically using something like the below:
Login-AzureRmAccount
Get-AzureRmSubscription
Select-AzureRmSubscription
Get-AzureRmContext
For those coming from the older Azure cmdlets, note that the ones used here are very familiar. They contain the “RM” string to indicate they work with Resource Manager. There is still a need to have both classicand RM tools since they are both currently supported.
We need to provide all of the necessary configuration details to the cmdlets. Things like which NIC to use, where the VHD is, which Resource Group is used for each item etc. Note that the resources may be split across different Resource Groups. You will need to verify the specifics for your environment, and update the script with the correct information.
The script is split out into different sections
# Global Variables
# Compute Variables
# Network Variables
# Network Script
# Compute Script
There is an option to either re-use the existing NIC or to create a new one (assuming that the original was previously deleted). One issue which I noted was when re-creating the VM with the existing VHD and re-using the NIC, Azure RM did not seem to like this when I also changed the availability set to match that of my internal load balancer. Hence I just deleted the old NIC and created a new NIC. The error received was:
Canada/providers/Microsoft.Compute/virtualMachines/Tail-CA-STS2 is using different Availability Set than other Virtual Machines connected to the Load Balancer(s) Tail-CA-DC-1-PublicLoadBalancer. ErrorCode: VmIsNotInSameAvailabilitySetAsLb
Script Download
The sample script can be downloaded from the TechNet scripting gallery. It is to be considered sample code, and requires you to update/complete all of the relevant sections.
Update 17-6-2020: The script has been moved to GitHub.
Running ze Script
You will need to gather the required information to populate the script. Do this by editing the variables to the correct values from your own subscription.
After double-checking your changes, time to let it rip. Connect to Azure RM, and run the script.
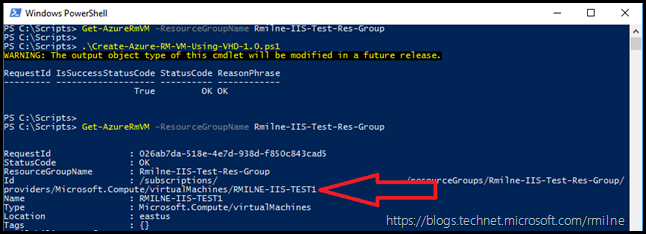
The below is an example of re-creating a VM. Note that we check to see what VMs are present initially in the given Resource Group. Initially there are none. Then we run the script which was edited to the correct values which creates the VM using an existing VHD.
Note that once the script finished, there is a VM listed. I have removed the SubscriptionID from the image, and also highlighted the VM name so that it stands out somewhat.
A couple of times I have had the below, which I happily ignore as the machine was created and was functional.
New-AzureRMVM : Long running operation failed with status 'Failed'.
ErrorCode: VMAgentStatusCommunicationError
ErrorMessage: VM 'Tail-CA-ADFS1' has not reported status for VM agent or extensions. Please verify the VM has a
running VM agent, and can establish outbound connections to Azure storage.
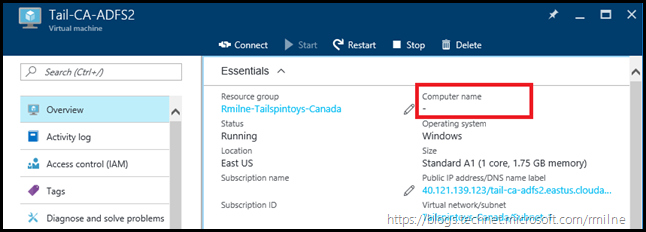
You may also note that the computer name is not listed in the Essentials section of the Azure RM portal. Note that there is a “-“ in the highlighted box below, where the computer name should be present.
This is discussed in this forum, and a fix is pending at this time.
Bootnote
There are some additional community scripts and tools out there. For example Paulo Marques published the below:
This is not an exhaustive list and I fully expect there to be some great options added via the comments!
Cheers,
Rhoderick


