Since I have been asked a few times about how I pimped tweaked my TechNet Forum signature I thought it would be prudent to write it up here. This was one of the main drivers for creating this blog in the first place – so I could avoid having to write the same email several times and instead it would be a “here’s the link which contains the answer!”.
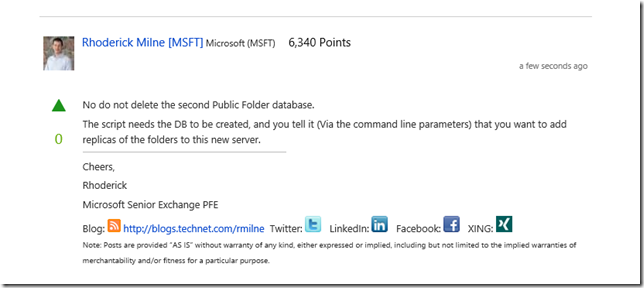
My current TechNet signature is shown below, and this is how it appears when rendered in the browser.
Updated 30-4-2014: Since the forums have had a revamp – the image was updated to reflect the new layout.
Assuming that you have a a TechNet forum account you can edit the signature associated with it. Make sure you are signed in to the forums by navigating to one of the many forums and using the sign-in link at the top right hand side.
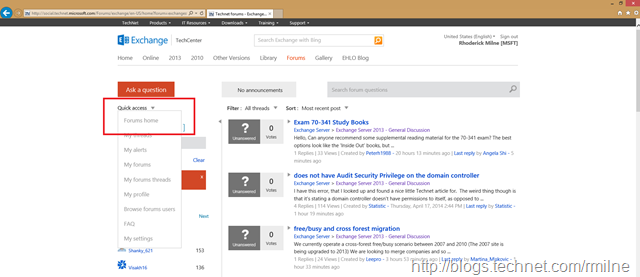
On the mid-right hand side, as shown in the red box below, under the “Quick Access” link you can find the “My Settings” link.
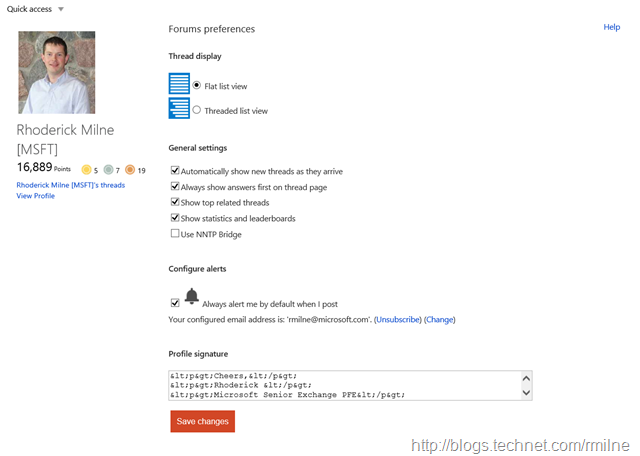
Clicking on “My Settings” will take you to the settings page.
There are various options on the settings page where you can edit and tweak your preferences.
For this discussion we are going to be interested in the box at the bottom that contains the signature.
Most people put plain text into this box, which is fine if this was 1995 and we were all still using Gopher. Feel free to drift off back into nostalgia….. How I miss IIS 3.0...
You will notice that mine does not contain plain text, and actually has basic HTML. This is the secret sauce that allows me to have the links to LinkedIn, Twitter and so on in my signature.
Note one thing: Do not go crazy with the content in this box as there is a limit to the number of characters that you can enter. The editor will allow you to enter above the limit, but any excess characters will be removed when you click submit. This is where we have to do some jiggery-pokery to get the signature down to a smaller size so that we can have multiple entries.
In short these are the high level steps:
- Locate URLs that you want to use
- Locate images that you want to use
- Shorten URLs
- Create and edit the HTML
- Save HTML to online signature
Locate URLs
You will want to carefully choose your URLs, and they may include links to a blog, Twitter or LinkedIn profile. Within each of these services obtain and write down the URL.
Locate Images
There are defined locations where the major social media sites have a link to their icons. Again work out what you want, and write them down.
Shorten URLs
As you read above the signature field is of a set size and this is why I use a URL shortening service. Since I am a Microsoft FTE I use the corporate service, https://aka.ms, though your can use any of the popular services for this. Be sure to research the service, and ensure that it is secure/reputable as you do not want the links to be altered so that instead of the LinkedIn image appearing under your name all a sudden the Backstreet Boys appear. That would be most uncool!
Create and edit the HTML
Create a .HTML file on your local machine and edit it with Notepad to create the HTML. By editing a local file it is easy to load it up in IE, and to see how it renders.
As an example this is my current signature contents.
Note I am not a developer, and am just a cable-plugger!
<p>Cheers,</p>
<p>Rhoderick </p>
<p>Microsoft Senior Exchange PFE</p>
<b>Blog:</b> <a href="https://blog.rmilne.ca/rss.aspx" target="_blank">
<img src="https://aka.ms/gmvm2k" border="0"></a> <a href="https://aka.ms/RMILNE">https://blog.rmilne.ca</a> 
<b>Twitter:</b> <a href="https://aka.ms/RMILNE-TW" target="_blank"><img src="https://aka.ms/iejgcv" border="0"></a>   <b>LinkedIn:</b>
<a href="https://aka.ms/RMILNE-LinkedIn" target="_blank"><img src="https://aka.ms/glr0s5" border="0"></a>   <b>Facebook:</b>
<a href="https://aka.ms/RMILNE-FB" target="_blank"><img src="https://aka.ms/x0lwhi" border="0"></a>   <b>XING:</b>
<a href="https://aka.ms/RMilne-XING" target="_blank"><img src="https://aka.ms/nnqy4c" border="0"></a>
<p><font size="1">Note: Posts are provided “AS IS” without warranty of any kind, either expressed or implied, including but not limited to the implied warranties of merchantability and/or fitness for a particular purpose.</font></p>
I’ll let you pick through that, and compare the HTML to the image at the top of this post. But it should be clear that I pull the image in from a shortened URL, and then add a target to it so that when someone clicks the picture it takes them to that link.
There are also plenty of sites that discuss the HTML tags and what they do; so pop any questions you have on them into www.bing.com
Note there is no need for opening and closing HTML tags as that is taken care of by the the page itself, we are only injecting content into an existing page.
Save HTML to Online Signature
When you are happy with the results of the local .HTML file and how it looks in IE, then copy and paste the contents into the online signature field and hit submit. Ensure that it was not too long and that the end was truncated.
Now enjoy your colourful HTML signature! Since we have moved on from Gopher we can party like its 1999. Oh wait…
Cheers,
Rhoderick


Thank You much!
Best regards