Like many other customers, the Tailspintoys Canada organization are leveraging Azure as part of their IT solution, and have done so for years. Because of this they have Azure resources in the old Azure model, and wish to transition to the new deployment methodology. In short they need to move from Azure Service Manager to the new Azure Resource Manager.
Azure Service Manager (SM) is also called Classic Azure, and the new Azure Resource Manager model is also known as Azure RM. This dual nature shows through in many areas:
-
Azure PowerShell and Azure RM PowerShell
-
Classic Portal and new Azure RM Portal
-
CLI and new Azure RM CLI
This is covered in Azure Deployment Models, along with why it is important to understand the differences. Note that resources may or may not be able to interoperate or be managed between the classic and RM models. This will also change over time as new features are added or moved to RM.
Migration Methodology
Microsoft allows you to migrate from Azure SM to Azure RM. The process to do so is straightforward, though you must spend time to understand how resources will be moved over and what changes will occur. The technical details can be reviewed in Technical deep dive on platform-supported migration from classic to Azure Resource Manager. This is a great resource to understand what becomes what in the new RM world. For example, get used to the fact that there are no Cloud Services in Azure RM. You also need to understand the limitations on moving resources. See the below for an example of this with regards to availability sets.
Note that the way you administer resources through the portal or PowerShell will change. This must be factored in.
There are additional considerations for the migration with regards to management of the resources and availability of the resources as they are migrated to Azure RM. This along with what is not currently support is discussed in Platform-supported migration of IaaS resources from classic to Azure Resource Manager. This is management plane and data plane availability:
- Management plane describes the calls that come into the management plane or the API for modifying resources. For example, operations like creating a VM, restarting a VM, and updating a virtual network with a new subnet manage the running resources. They don't directly affect connecting to the instances.
- Data plane (application) describes the runtime of the application itself and involves interaction with instances that don’t go through the Azure API. Accessing your website or pulling data from a running SQL Server instance or a MongoDB server would be considered data plane or application interaction. Copying a blob from a storage account and accessing a public IP address to RDP or SSH into the virtual machine also are data plane. These operations keep the application running across compute, networking, and storage.
If you have a classic VM which is not part of a virtual network, it must be added to one as part of the migration. All VMs need to part of a virtual network in the Azure RM model. You can migrate the VM into an existing virtual network or a new one. The VM will be restarted as part of this process.
Azure SM VMs which are already part of a virtual network should not need to be restarted, though currently there are limitations if you have configured multiple availability sets in the same Cloud service.
Migration Process
The migration process is straight forward, and documentation can be found here. Since cloud changes on a frequent basis, please consult the article for the latest information.
In short you will need to:
- Plan for Migration
- Install Azure RM PowerShell
- Configure subscription for migration
- Confirm resource availability
- Migrate resources
- Test & verify
- Update tools and processes
Depending if the classic VMs were deployed with or without a virtual network you will need to follow the appropriate process. Tailspintoys always used virtual networks in their deployment so that is what will be used here.
Plan For Migration
For most VM configurations, only the metadata is migrated between the Service Manager and Resource Manager deployment models. The underlying VMs are running on the same hardware, in the same network, and with the same storage. Management-plane operations may not be allowed for a certain period of time during the migration. However, the data plane continues to work. That is, your applications running on top of VMs (classic) do not incur downtime during the migration.
The following configurations are not currently supported. If support is added in the future, some VMs in this configuration might incur downtime (go through stop, deallocate, and restart VM operations).
-
You have more than one availability set in a single cloud service.
-
You have one or more availability sets and VMs that are not in an availability set in a single cloud service.
For every cloud service in the classic deployment model, the Azure platform creates a resource group name that has the pattern cloud-service-name-migrated.
What if I don't like the names of the resources that the platform chose during migration?
All the resources that you explicitly provide names for in the classic deployment model are retained during migration. In some cases, new resources are created. For example: a network interface is created for every VM. We currently don't support the ability to control the names of these new resources created during migration. Log your votes for this feature on the Azure feedback forum.
Install Azure RM PowerShell
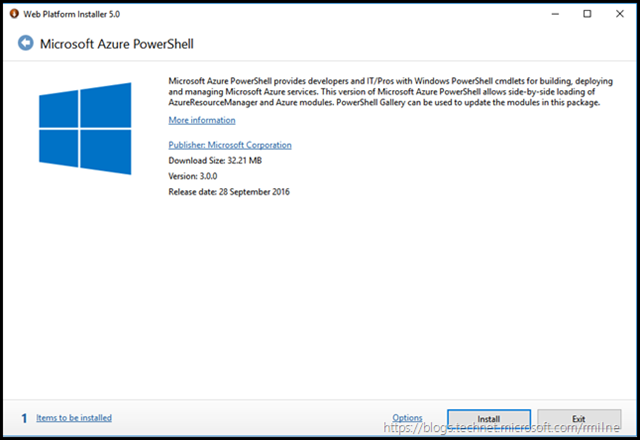
The latest build of Azure RM PowerShell was installed. This post was written in October 2016.
Configure Subscription For Migration
Once you have installed Azure PowerShell and authenticated to your subscription, it is required that you configure the subscription to enable migration. in the below commands we login to the Azure RM account, list available subscriptions and select the one we whish to work with. Then we check the current status of the migration provider. It is not enabled by default. Then we register the migration provider, wait 5 minutes and verify that it is listed as registered. The below commands can be used to connect and authenticated to the Azure RM Account:
Login-AzureRmAccount
Get-AzureRMSubscription
Select-AzureRmSubscription –SubscriptionName insertcorrectnamehere
Initially the RegistrationState will not state Registered. We can check the initial status using:
Get-AzureRmResourceProvider -ProviderNamespace Microsoft.ClassicInfrastructureMigrate
In order to register, run the below and wait 5 minutes.
Register-AzureRmResourceProvider -ProviderNamespace Microsoft.ClassicInfrastructureMigrate
Before proceeding further, verify that RegistrationState is listed as Registered.
Get-AzureRmResourceProvider -ProviderNamespace Microsoft.ClassicInfrastructureMigrate
Confirm Resource Availability
Before proceeding, ensure that there is sufficient budget and resources available.
Migrate Resources
There are discreet steps in the migration process:
- Validate
- Prepare
- Abort or Commit
Firstly we validate that the Azure SM deployment is able to be migrated to Azure RM, if there are unsupported roles or detected issues you will receive a validation error message. If there are issues address them, re-do validation and proceed accordingly. Once validation has passed, the resources and then prepared. Finally the process is committed or aborted.
Noted that all of these steps can be considered as idempotent. Idempotence is the property of certain operations in mathematics and computer science, that can be applied multiple times without changing the result beyond the initial application. The concept of idempotence arises in a number of places in abstract algebra and functional programming.
In short if there are issues with prepare or validate identify and resolve them, then repeat the task. it will not affect the outcome.
Migration of Virtual Machines (In a Virtual Network)
Migration of Azure SM VMs which are part of a Virtual Network has a nice eloquent methodology. By migrating the Virtual network, all of the VMs associated to the Virtual network are migrated to Azure RM. We need to specify which Virtual Network will be migrated, and then follow the steps listed above to validate, prepare and commit the migration.
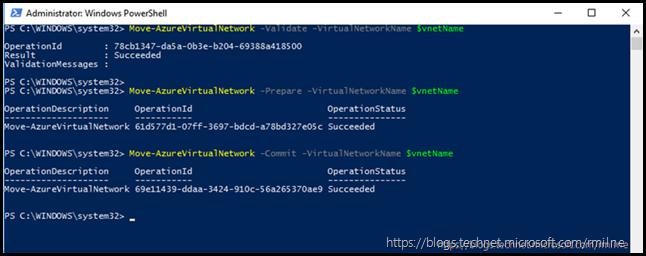
The below PowerShell code can be used to perform the migration. To save typing, the Virtual Network name is saved into the variable $vnetName.
$vnetName = "myVnet"
Move-AzureVirtualNetwork -Validate -VirtualNetworkName $vnetName
Move-AzureVirtualNetwork -Prepare -VirtualNetworkName $vnetName
Move-AzureVirtualNetwork -Commit -VirtualNetworkName $vnetName
Move-AzureVirtualNetwork -Abort -VirtualNetworkName $vnetName
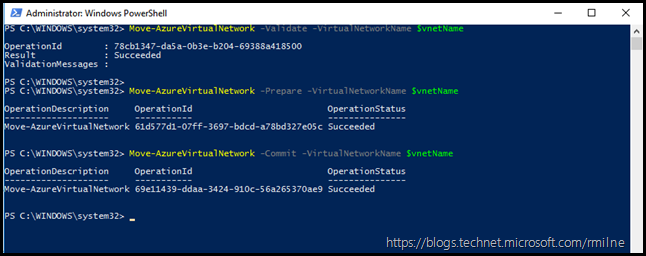
If all of the necessary preparation was done, you will should not receive any angry red text. The below is an example of such a “boring” migration.
Rather than dwell upon such glory, let’s take a look at a couple of errors at the end of this post.
Once all the Virtual Networks were moved over, the Storage Accounts were also migrated so that everything which is related is present in Azure RM. The same process is used as when migrating the Virtual Network.
$storageAccountName = "rmilnetailspintoyscanada"
Move-AzureStorageAccount -Prepare -StorageAccountName $storageAccountName
Move-AzureStorageAccount -Commit -StorageAccountName $storageAccountName
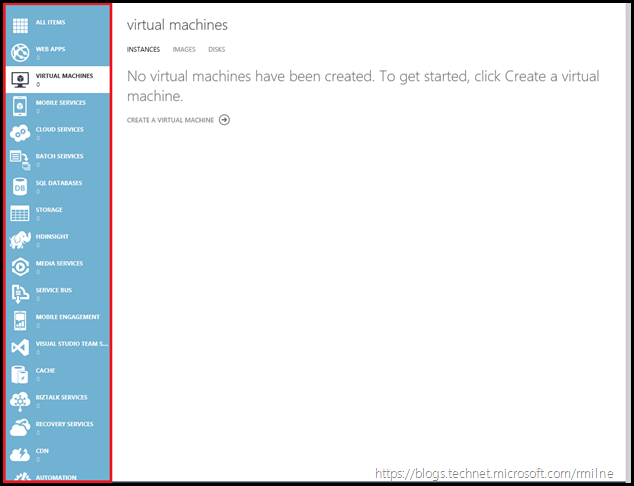
The below is a view of Azure SM, note that all resources were moved. No IAAS resources are listed.
Test & Verify
At this time you will need to ensure that all of the migrated resources are working correctly. This does not mean that RDP works to the VM, rather you then need to ensure that all of your applications and services continue to function as before.
Update Tools And Processes
Now that the resources are in Azure RM, there are different management cmdlets and the new Azure Portal. Make sure that all team members know of this and all of the management processes now function using the new Azure RM namespace. Take the time to test all of your scripts and processes before you get an unpleasant surprise later on!
Troubleshooting
The below are some errors that you may encounter along the way.
Move Azure Network – Deployment Failed
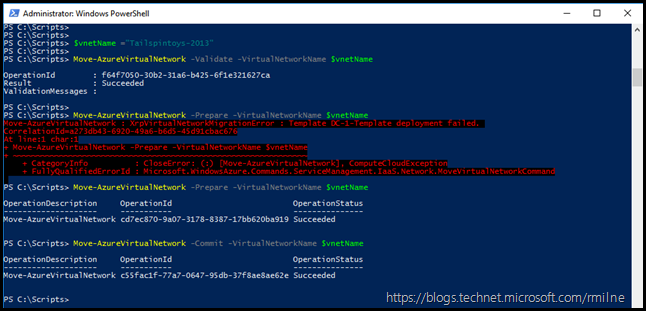
In the example below, a separate Virtual Network was being migrated. The Virtual Network and VMs are an Exchange 2013 based lab.
The Virtual Network passed validation with no issues, but then on the prepare phase it hit a wobbly.
Move-AzureVirtualNetwork -Prepare -VirtualNetworkName $vnetName
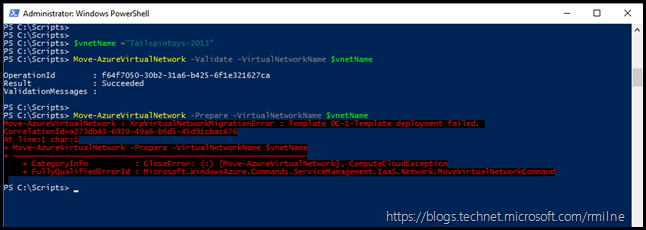
Move-AzureVirtualNetwork : XrpVirtualNetworkMigrationError : Template DC-1-Template deployment failed.
CorrelationId=a273db43-6920-49a6-b6d5-45d91cbac676
At line:1 char:1
+ Move-AzureVirtualNetwork -Prepare -VirtualNetworkName $vnetName
+ ~~~~~~~~~~~~~~~~~~~~~~~~~~~~~~~~~~~~~~~~~~~~~~~~~~~~~~~~~~~~~~~
+ CategoryInfo : CloseError: (:) [Move-AzureVirtualNetwork], ComputeCloudException
+ FullyQualifiedErrorId : Microsoft.WindowsAzure.Commands.ServiceManagement.IaaS.Network.MoveVirtualNetworkCommand
Remember that new word you promised yourself would be used in conversation more often from earlier in this post?
[Queue frantic upwards scrolling! After subsequent scrolling back down, I see you are back! ]
Yes that lovely word called Idempotant. We can simply re-try the operation, and the outcome is not affected. One swift press of the up cursor key to repeat the command, and it completes successfully.
Note that the subsequent prepare operation was successful, and we are able to then complete the migration with a commit. No further errors were logged.
Error On Validation
In this example we are moving another Virtual Network. This Virtual Network has the Tailspintoys Canada Exchange 2010 lab along with AD FS. Two Cloud Services were previously created for this environment since both Exchange and WAP are published to the Internet on TCP 443. A single Virtual Network with multiple subnets was used. Since AD FS must be highly available, the two AD FS servers and two WAP servers exist in separate Availability Sets. In short, there were multiple Availability Sets in a single Cloud Service.
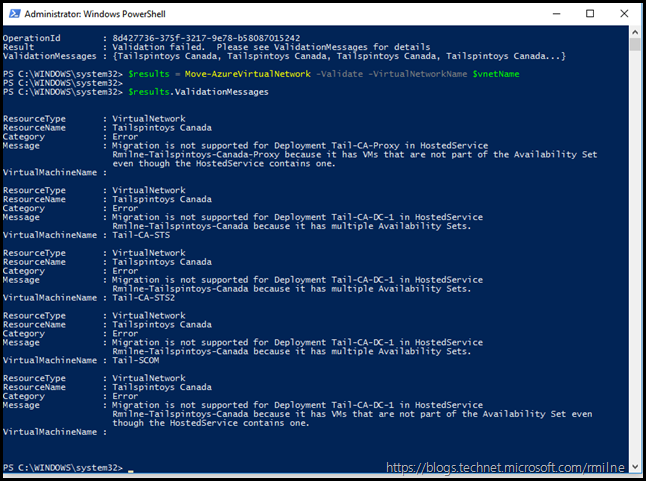
As noted earlier there are issues when migrating Virtual Networks with multiple Availability Sets. What happens if we just give it a whirl? Let’s do the initial validate phase and see what comes back;
Move-AzureVirtualNetwork -Validate -VirtualNetworkName $vnetName
As expected this raised warnings. Unfortunately we do not get to see all of the details behind the ValidationMessages. The below PowerShell can be used to drill into the details to see what is going on:
$results = Move-AzureVirtualNetwork -Validate -VirtualNetworkName $vnetName
$results.ValidationMessages
For the benefit of the search engines:
Migration is not supported for Deployment Tail-CA-Proxy in HostedService Rmilne-Tailspintoys-Canada-Proxy because it has VMs that are not part of the Availability Set
even though the HostedService contains one.
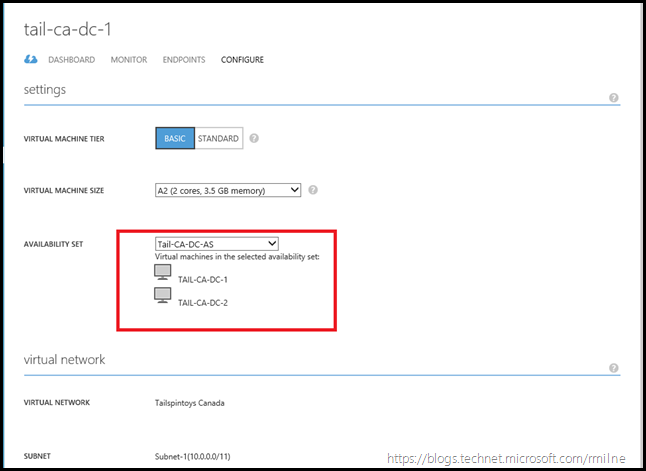
To remediate this, we need to plan a maintenance window to change the source Cloud Service. In the Azure SM portal, we will remove the additional Availability Sets for the different roles so that the cloud service contains one. The below shows removing the dedicated Availability Set for the Domain Controllers. We are looking at the properties of a DC, and can see that it is a member of an Availability Set which only contains the DCs. This is in addition to the other Availability Sets which exist within this single Virtual Network and Cloud Service.
One by one, remove the respective machines from the availability set. Do not try and remove all of the machines in the same availability set simultaneously. It will error out. This will also restart the VMs so you will need to plan and account for this. Hence the comment above about doing this in a maintenance window.
Once we are down to a single Availability Set, we will then repeat the validation request:
Move-AzureVirtualNetwork –Validate-VirtualNetworkName $vnetName
Success!
Now we will move on to prepare and commit the migration:
Move-AzureVirtualNetwork -Prepare -VirtualNetworkName $vnetName
Move-AzureVirtualNetwork -Commit -VirtualNetworkName $vnetName
Additional Post Migration Steps
The below are some additional steps you may want to review after migrating the resources over to Azure RM.
Re-Create Availability Sets
You had Availability Sets created in the Azure SM deployment for a reason. If you had to remove some to allow the Virtual Network to be migrated then you will most likely want to re-create them. However Azure RM does not let you change the Availability Set assigned to a VM at the time of writing, the Availability Set is defined at VM creation.
You will need to delete the VM, then re-create it and specify the correct availability set when the VM is being re-created. This then leads to another current issue where the Azure RM portal does not let you create a VM from an existing VHD. To create the VM from an existing VHD please use this Azure RM PowerShell script.
Clean-Up Resource Group Names
I fully acknowledge that I have OCD issues, and did not like the “-Migrated” string which was added to the migrated resources. In addition to this, note the two entries, the second one has a random character “k” at the end. This just lit up my OCD….
To fix this we can migrate the resources into Resource Groups that have nicely formatted names. We can do this the Portal or via PowerShell.
Using Portal
To move resources to a new resource group in the same subscription, select the resource group containing those resources, and then select the Move button.
Or, to move resources to a new subscription, select the resource group containing those resources, and then select the edit subscription icon. Select the resources to move and the destination resource group. Acknowledge that you need to update scripts for these resources and select OK. If you selected the edit subscription icon in the previous step, you must also select the destination subscription.
This is the the initial Resource Group, highlighted with the red line.
Click the Move button to move the Resources to new Resource Group.
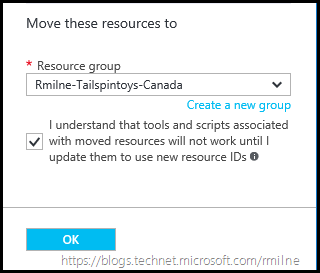
You then choose which Resource Group to move to. Note that I have a nice new name selected.
A warning prompt is displayed regarding the tools and scripts. if you click the little information icon the below popup.
Clicking Learn More will take you to Move resources to new resource group or subscription
Using PowerShell
To move existing resources to another resource group or subscription, use the Move-AzureRmResource command.
Cheers,
Rhoderick
