Azure now offers the capability to configure static IPs onto IAAS VMs. Static IP assignment in Azure VMs is not the same as configuring a typical static IP for a server in your on-premises network. When you statically assign an IP address to the Azure VM, it is not entered into the VMs machine’s TCP/IP configuration property sheet. Rather a reservation is created, so that DHCP hands out the desired address to the VM. If you look at the VM’s NIC, it is still set as a DHCP client, but the DHCP server will honour the reservation that you configured.
At the time of writing, the capability to assign static IP addresses does not currently exist in the graphical interface – Azure PowerShell to the rescue!
Update 23-2-2016 – added section to note changes in new portal where it is possible to assign IPs via the portal.
Note while it is also possible to configure a static IP at VM creation time, this post focuses on changing existing VMs.
Installing Microsoft Azure PowerShell
Microsoft Azure PowerShell download and connection details are available here with documentation. The remainder of this post assumes that Microsoft Azure PowerShell is correctly installed and you have a valid Azure subscription.
Connecting Using Microsoft Azure PowerShell
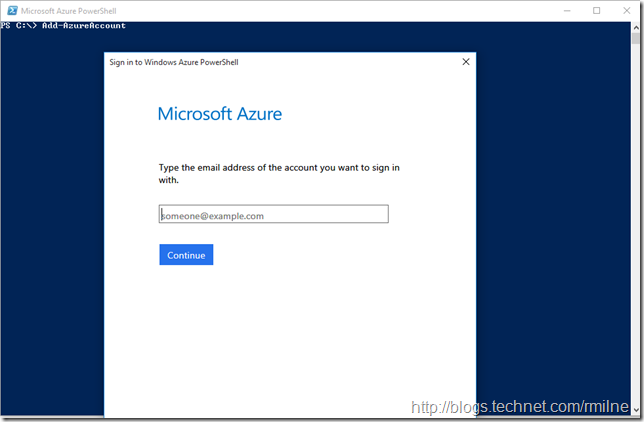
Once installation completes, launch Microsoft Azure PowerShell and connect to the service. Add your account with Add-AzureAccount. Enter the required credentials. Once the Azure Account has been added, it may be necessary to select the subscription using Select-AzureSubscription -SubscriptionName "SubName”.
If required Get-AzureSubscription will list all of the subscriptions.
Now that we are connected, lets take a look at the commands available to us..
Exploring Available Static IP Cmdlets
In the Microsoft Azure PowerShell session we can use the standard Get-Command to look for cmdlets that related to Azure Static IP configuration:
Get-Command *AzureStatic*
There are four cmdlets available:
-
Get-AzureStaticVNetIP
-
Remove-AzureStaticVNetIP
-
Set-AzureStaticVNetIP
-
Test-AzureStaticVNetIP
In order to use them, we also need to know the names of the Azure Virtual Networks. Yes we can look in the Azure management portal, but let’s <Gold 5> stay on target </Gold 5> * and use PowerShell to list them!
To get a listing of the Azure Virtual Networks within the subscription we can run:
Get-AzureVNetSite | Select Name
Now that we have the necessary background information, time to examine the VM static IP options!
Check Pool of Available Azure IP Addresses
We can use the Test-AzureStaticVNetIP cmdlet to determine if a given IP is available. In the first example IP 10.0.0.4 is already taken. The property isAvailable is reported as $False.
Test-AzureStaticVNetIP –VNetName “TailspintoysCanada” -IPAddress 10.0.0.4
In the pool of addresses, note that 10.0.0.9 is shown as available. What does isAvailable return for that IP?
Test-AzureStaticVNetIP -VNetName TailspintoysCanada -IPAddress 10.0.0.9
It is listed as being available since $True is returned.
Using Azure PowerShell To Set Static IP For An Existing VM
If we try to simply set the Azure VM to use a given IP by simply specifying the VM name, PowerShell does not understand this as it expects an object to represent the VM, not a string.
The error returned is:
Set-AzureStaticVNetIP : Cannot bind parameter 'VM'. Cannot convert the "Tail-CA-Exch-1" value of type "System.String" to type "Microsoft.WindowsAzure.Commands.ServiceManagement.Model.IPersistentVM".
At line:1 char:27
+ Set-AzureStaticVNetIP -VM Tail-CA-Exch-1 -IPAddress 10.0.0.5
+ ~~~~~~~~~~~~~~
+ CategoryInfo : InvalidArgument: (:) [Set-AzureStaticVNetIP], ParameterBindingException
+ FullyQualifiedErrorId : CannotConvertArgumentNoMessage,Microsoft.WindowsAzure.Commands.ServiceManagement.IaaS.SetAzureStaticVNetIPCommand
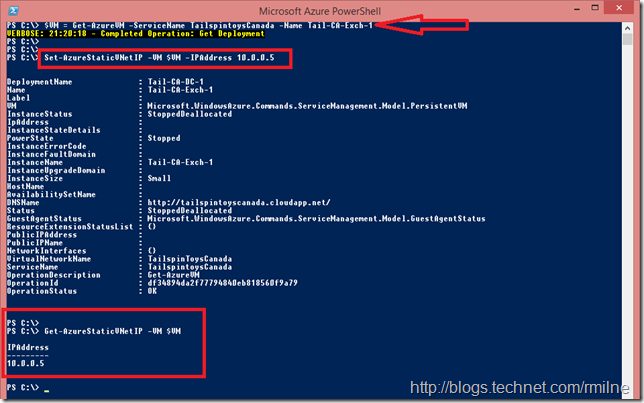
Let’s save the VM’s details to a variable called $VM and then pass that to the Set-AzureStaticVNetIP cmdlet. That should work, right?
$VM = Get-AzureVM -ServiceName TailspintoysCanada -Name Tail-CA-Exch-1
Set-AzureStaticVNetIP -VM $VM -IPAddress 10.0.0.5
Get-AzureStaticVNetIP -VM $VM
However booting the server up, and checking the assigned address using ipconfig will show that the change did not take effect. This is because the cmdlet to update the Azure VM configuration was omitted.
We need to leverage the Update-AzureVM cmdlet.
Set-AzureStaticVNetIP -VM(Get-AzureVM –ServiceName TailspintoysCanda –Name Tail-CA-Exch-2) -IPAddress 10.0.0.7
Adding Update-AzureVM to our command yields a better result, with the VM being updated. Note the additional yellow text stating the deployment has been updated.
Note that if you look at the server’s NIC, it will still be a DHCP client due to the reservation system that is used by Azure.
Updating A Running VM
Can we update an VM which is currently running?
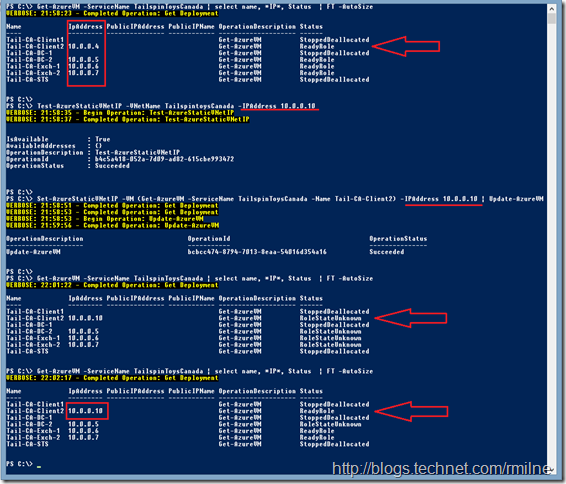
The answer to this is yes and no. Yes you can change the IP assigned to the VM which is currently running, but it does not stay running. It is restarted to apply the change. Just the same as when resizing a VM. In the below example let’s change the machine Tail-CA-Client2. This is currently running with a dynamic IP of 10.0.0.4. We then verify that IP 10.0.0.10 is available, and assign it to the VM.
Note that the status of the machine then changes to RoleStateUnknown and after a couple of minutes the VM has restarted and the status is now ReadyRole. Click to expand the image.
Removing Static IP From Azure VM
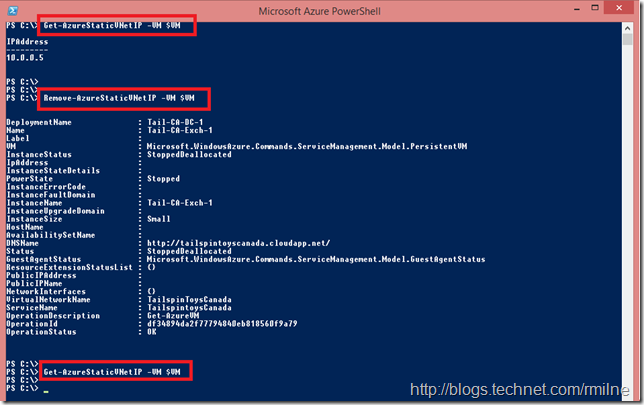
Removing a static IP from an Azure VM can be done with the Remove-AzureStaticVNetIP cmdlet. In the below example we demonstrate that the static IP of 10.0.0.5 is currently set. This static IP is then removed, and finally we check to ensure that the static IP has been removed. The commands used were:
Get-AzureStaticVNetIP -VM $VM
Remove-AzureStaticVNetIP -VM $VM
Get-AzureStaticVNetIP -VM $VM
Managing IP Addresses In The New Portal
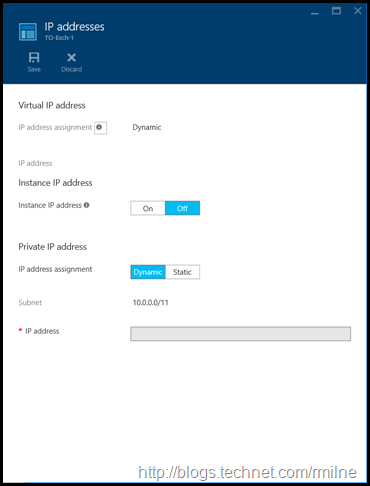
In December 2015, the new portal was moved to General Availability. This adds significant capabilities to the management of Azure resources. In the context of this post, it is now possible to add static IPs to your Azure VMs through the new portal UI. In the settings blade of the VM, select IP addresses. The below window will open allowing you to make the necessary changes.
Cheers,
Rhoderick
* – Link to Star Wars Gold Leader
