As mentioned in this blog's previous posts on deploying AD FS, one option is to deploy all or part of the AD FS solution in Azure. This is very valuable if there is insufficient capacity on-premises or if you only have a single datacentre and wish to increase resiliency.
Deploying the AD FS solution or connecting it to Azure is pretty straight forward. However, if you not correctly plan the Azure implementation it will come back to bite you. Do not skip the planning cycle. If you do then you will then have to delete and recreate some of the resources which is a pain. Some of the areas to ensure you plan correctly are:
-
Network subnets
-
Network routing
-
Network ACLs
-
Availability Sets
-
Resource Groups
-
Naming scheme
-
Load balancer configuration
-
Storage Accounts
-
Fault Domains
-
Update Domains
In this post we will load balance the AD FS farm. This is an internal load balanced endpoint, and is not available to the Internet. Externally the Web Application Proxy (WAP) servers have a separate load balanced and are published to the Internet. We will look at the Web Application Proxy (WAP) load balancing in a separate post.
Overview
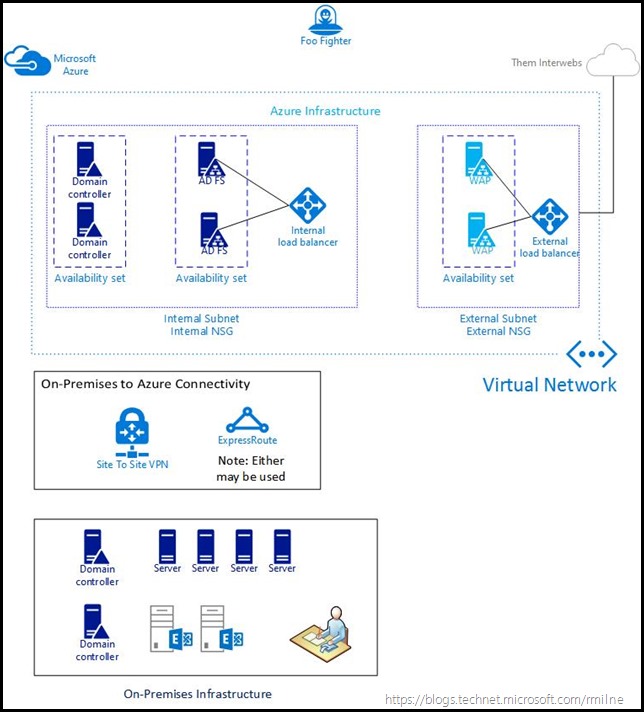
The below is an example of how the Azure infrastructure could be laid out. I’ll omit the details about creating redundant storage accounts, placing machines into different availability sets etc. You can take a look at the regular Azure documentation for that. Same applies for creating the Site to Site VPN or deploying express route.
The new Azure Resource Manager (RM) model was used instead of the traditional service manager.
Note that a single virtual network was created in Azure. It contains two subnets, an internal and external. The internal is used for the domain joined resources such as the AD FS servers and the domain controllers. There is Site to Site VPN connectivity between the internal and the on-premises network infrastructure. The second subnet in the Azure virtual network is to create a screened subnet for the Web Application Proxy (WAP) servers.
The two subnets are protected by Network Security Groups (NSG) which has ACLs set to only allow the desired traffic. Only TCP 443 is allowed between the WAP and AD FS servers.
The AD FS servers are placed into their own Availability Set, The same is true for the WAP servers. For the other infrastructure servers, you can chose how you want to deploy them. The domain controllers in the above example were also placed into their own Availability Set. This is done to maximise availability of each of the solution’s components.
One of the key aspects here is the design of the Availability Set. These are tied to the load balanced configuration, and as such each set of servers that you want to load balance need to be in the same Availability Set. Unfortunately if this is not done, there is currently no way to change the availability set from within the Azure RM portal. If you did not place the VM into the correct Availability Set, delete the VM and retain the VHD. Then recreate the VM using the existing VHD. This time make sure to choose the correct Availability Set.
Build Out Underlying Infrastructure
Install the necessary VMs, and be sure to place them into the correct Resource Group, Availability Set etc. when you are creating them. The AD FS servers must be domain joined. WAP servers are in a workgroup. Ensure that the Azure Virtual Networks, Subnets and Network Security Groups have been created. You will need to add ACLs to allow access to the Network Security groups to permit TCP 443 traffic from WAP to AD FS, and also to the WAP servers from the Internet.
The VMs should also be fully patched from your internal SCCM/WSUS system or from Microsoft Update. AD FS patches in AD FS 2012 R2 onwards are part of the OS updates.
In my case all VMs were set to use static addresses. They necessary machines were joined to AD DS and were fully patched. A single AD DS domain is used.
Install AD FS
Please review the setup steps in the following series of posts:
Load Balance AD FS
In order to create, configure and use the Azure load balancer we need to:
-
Create the Azure internal load balancer
-
Add back end pool
-
Add probes
-
Add load balancing rules
-
Test AD FS Servers
-
Update DNS
In this environment, the Availability Set for the AD FS servers is called Tail-CA-STS-AS. Both AD FS servers were added to this Availability Set when they were created.
We will create a internal load balancer called Tail-CA-INT-LB which will be assigned a static internal IP address of 10.0.0.50.
Create the Internal Azure load balancer
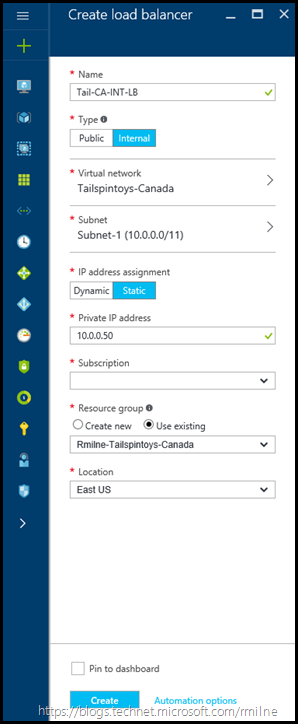
From the Azure Portal, click to add a new load balancer. You will need to do several steps to configure the load balancer:
-
Provide a name
-
Set Type to be internal
-
Select the correct virtual network
-
Select the internal subnet
-
IP assignment was set to static, and the static IP was typed in
-
Chose the relevant subscription, resource group and Azure region
Review the configuration, and when happy click create.
Add Back End Pool
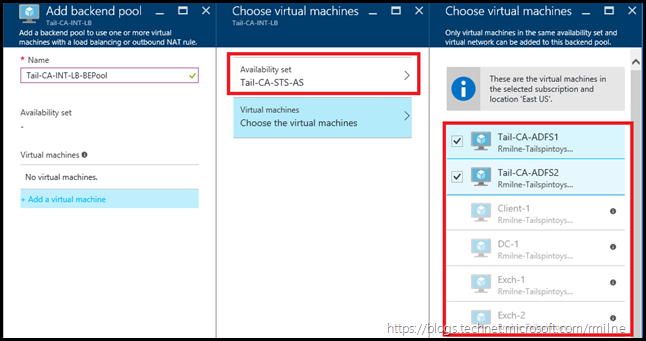
Click to add the back end pool of machines which are to be load balanced. As you will see below, the Availability Set was first selected. In this case the Tail-CA-STS-AS was selected. Then we can choose the VMs to add. Note that in the right hand pane only two of the VMs can be selected. The others are greyed out, why you ask? Because only VMs in the selected Availability Set can be added. Note that the two AD FS servers are selected as they were added to the Tail-CA-STS-AS availability set when the VM was created. You can also click onto the little black information icon on one of the greyed out VMs to get a popup with the same information.
Click to save the configuration changes to the back end pool. Wait for the changes to be applied.
Then click create. The request will be validated, and if all is good then it will be built.
Add Probes
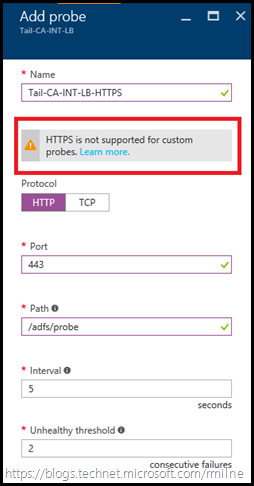
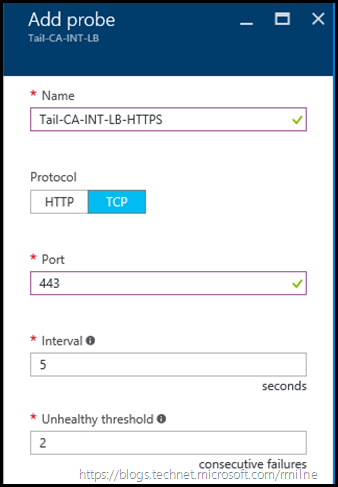
Select the probes section on the load balancer, and then click add. Fill in the necessary details. In the example below we will probe the AD FS servers on TCP 80 and query for the /adfs/probe endpoint.
As reviewed in Hardware Load Balancer Health Checks and Web Application Proxy / AD FS 2012 R2 the HTTP probe is a newer option than the original HTTPS Server Name Indicator (SNI) checks.
The August 2014 Windows Update rollup shipped new HTTP based health check probe functionality in ADFS 2012 R2 and the AD FS Proxy service that runs as part of the Web Application Proxy server role.
This avoids any issues with load balancers, SSL certificates and SNI. It also supports the use of both FQDN’s and IP addresses in the probe helping avoid any potential host header issues. The new HTTP probe can be accessed over HTTP using the path /adfs/probe
For example:
http://<Web Application Proxy name>/adfs/probe
http://<ADFS server name>/adfs/probe
http://<Web Application Proxy IP address>/adfs/probe
http://<ADFS IP address>/adfs/probe
In the current Azure RM portal, changing the port to TCP 443 and attempting to check the /adfs/probe endpoint is not allowed. Note in the image below the port is TCP 443 and that HTTP was chosen.
Changing to protocol type of TCP removes the option to poll the /adfs/probe endpoint. It is a TCP port check only. See the end of this post for more details on this.
Because of this, the HTTP check to /adfs/probe will be used.
Load Balancing Rules
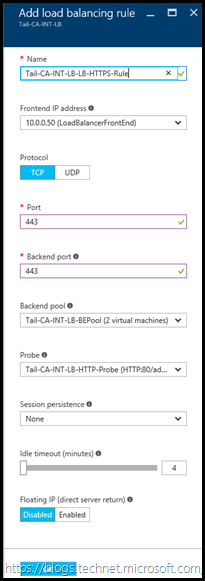
Select the Load Balancing section. Click add to create a load balancing rule. In the below example note that the backend port is TCP 443. This is because clients will use HTTPS on TCP 443 to communicate to the AD FS server. Note that session persistence is not required since AD FS uses cookies and is stateless.
Click OK to save the configuration.
Test AD FS Servers
When the AD FS farm was being built, hosts files should be used to ensure that each individual server is functioning correctly. If that was not done, best to check all is peachy before making additional changes. From a client machine in the domain, edit the local hosts file to resolve the AD FS namespace to each server in turn. Close IE before each test to ensure that it has not cached the previous IP. Once the hosts file has been updated, open IE and browse to: https://<AD FS namespace>/adfs/ls/idpinitiatedsignon.htm
In the case of TailspinToys the namespace used is:
https://adfs.tailspintoys.ca/adfs/ls/idpinitiatedsignon.htm
You can also review the federation metadata. The below is again the TailspinToys example:
https://adfs.tailspintoys.ca/federationmetadata/2007-06/federationmetadata.xml
Once both servers have been validated we can then update the hosts file to point to the VIP. This allows us to verify that the load balancer is working as expected prior to changing the DNS A record and potentially impacting all users. Repeat the test to the VIP. If all checks out, then it is time to update DNS.
Just be sure to rem out or delete the test machine’s hosts file entry, or that could be an issue down the line….
Not that rogue hosts file entries have every caused an issue……
Update DNS
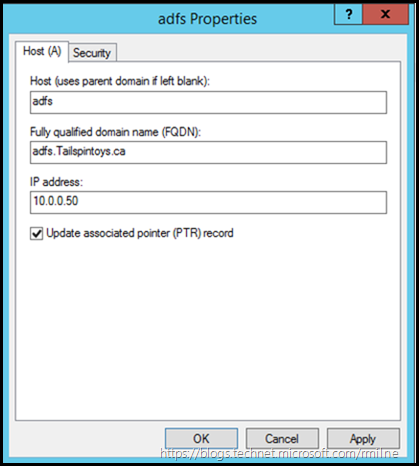
We need to change the DNS A record so that it points to the new load balanced VIP. In this case AD DS holds the internal tailspintoys.ca zone, so we need to update the A record there.
Once the record has been updated and replicated to other DNS servers, we can go back to the client to validate all is still OK.
Do not use a CNAME record. This is covered in my linked articles on how to install AD FS.
Azure RM Load Balancer Health Probe Logs
At the time of writing the Azure RM internal Load Balancer does not support logging the Health Probe logs.
This does complicate troubleshooting server issues.
To workaround this issue, use the previously mentioned hosts file approach to verify and trouble shoot servers.
Additional Reading
The below references have some more detail on Azure load balancing
Internal load balancer overview
Understand load balancer probes
Get started creating an Internal load balancer using Azure portal
David Goddard posted additional details on the probes onto the Azure blog, please see Endpoint Load Balancing Heath Probe Configuration Details.
Cheers,
Rhoderick
